Why Most People Slow Down the TSA Line
Airport security has gotten complicated with all the confusion and misinformation flying around. As someone who has passed through TSA checkpoints roughly 200 times over the last four years, I learned everything there is to know about moving through security fast. Today, I will share it all with you.
Here’s the uncomfortable truth: most delays are self-inflicted. Forgotten liquids buried under a sweater. Boots that take two minutes to unlace. A belt with a heavy buckle. Coins rattling in a jacket pocket. A laptop crammed sideways into a carry-on. A TSA officer I spoke with at Denver International told me their average backup happens because travelers simply haven’t thought through the five-minute choreography of moving through a checkpoint. That’s fixable — and not even that hard, honestly.
What to Do Before You Even Get to the Airport
Organization the night before erases half your checkpoint friction. Pack your carry-on with security in mind, not convenience. Those are two very different things.
Arrange Your Bag for the Scanner
Your 3-1-1 liquids bag goes in the front pocket or the very top of your carry-on. Don’t bury it under a fleece. Your laptop should be reachable in under three seconds — I keep mine in the front section of my main compartment, nothing on top of it. Charger cords and cables should sit loosely coiled inside a small zippered pouch. Not tangled at the bottom of your bag like a bird’s nest. That’s what makes organized packing endearing to experienced travelers — it takes ten extra minutes at home and saves everyone in line behind you.
Wear the Right Shoes
Slip-ons. Non-negotiable. Lace-up shoes eat 30 seconds per person — multiply that across a family of four and the line behind you is already frustrated. Boots with multiple buckles? Worse. I’m apparently a slip-on person now, and Allbirds Tree Runners work for me while lace-up sneakers never move fast enough at 5 a.m. Don’t make my mistake of wearing Timberlands to a 6:30 a.m. flight out of LAX. They practically had to peel me out of line.
Empty Your Pockets Before Arriving
This sounds obvious. Most people still don’t do it. Keys, phone, wallet, loose change — all of it goes into your carry-on before you leave the house. The goal is walking up to security with genuinely empty pockets. No belt. No watch. No jacket draped over your arm like a question mark. It either goes into your bag before you leave or it goes straight into a bin the moment you arrive. Pick one.
Check Airport Wait Times and TSA Rules
Download the official TSA app — seriously, it’s free. It shows real-time wait times at specific checkpoints inside specific airports. Atlanta alone has multiple security entrances. The north checkpoint might be running 45 minutes while the south entrance is sitting at 15. You won’t know unless you check. Also worth a quick look: the airport’s website. Some airports run restricted bin protocols, specific laptop screening rules, or seasonal screening changes that catch travelers completely off guard.
How to Move Through the Checkpoint Line Quickly
So, without further ado, let’s dive in — this is the bin choreography that separates fast travelers from everyone else.
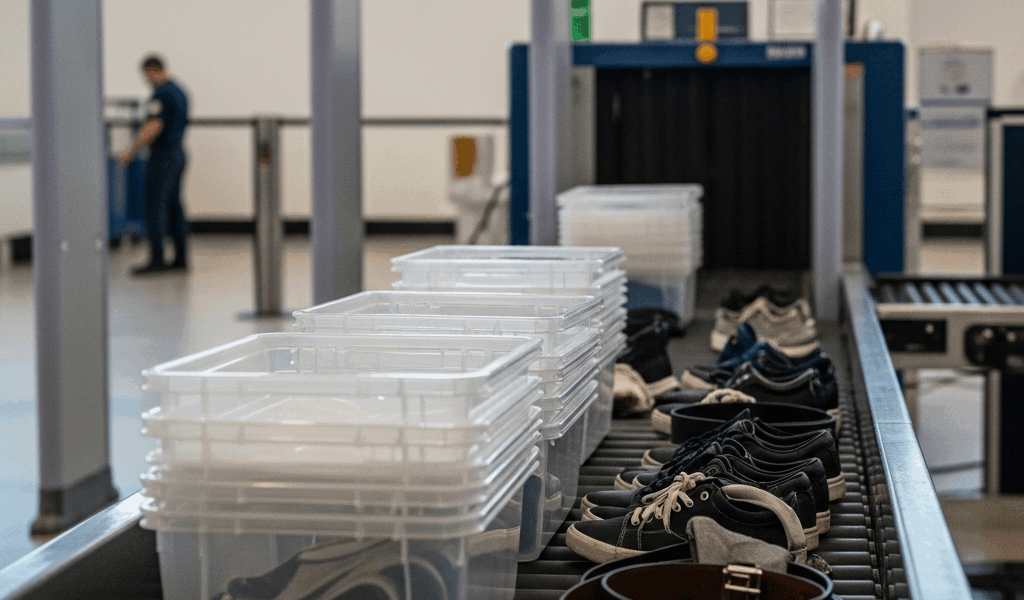
The Bin Loading Sequence
Laptop out first. Flat in the first bin — not standing upright, flat. Jacket and shoes follow in the next bin. Carry-on bag goes in last, positioned so it enters the X-ray machine last and exits first. That order matters. You want to grab your bag and walk away without standing there waiting for your shoes to clear the scanner while three people stack up behind you.
Never stack bins on top of each other. I watched someone stack three bins simultaneously at O’Hare — the TSA officer made them undo the whole thing and restart. Backed up the belt for a solid two minutes. One person, one clean line of bins, moving in order. That’s it.
Where to Stand and How to Grab Your Stuff
Stand just left of the belt exit. Watch your items come through. Grab your carry-on first, step completely aside — not halfway aside, completely — so your shoes and jacket can clear the belt without you blocking them. Then find the nearest bench and put yourself back together there. Not at the belt. Not in the middle of the flow. Move past the security threshold, then organize.
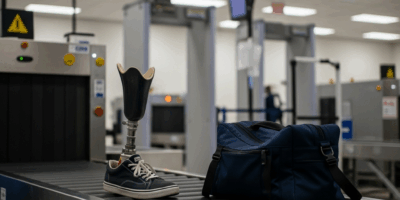
Medical Devices and Special Items
CPAP machine, insulin pump, breast pump, approved medical liquids — tell the officer before you reach the belt. Not at the belt. Before. They’ll run a separate scan or follow a specific protocol, and getting ahead of it takes maybe 60 seconds. Waiting until the scanner flags it and then explaining everything from scratch takes considerably longer. Mobility aids fall into the same category. Upfront communication is the move here.
Common TSA Mistakes That Cost You Time
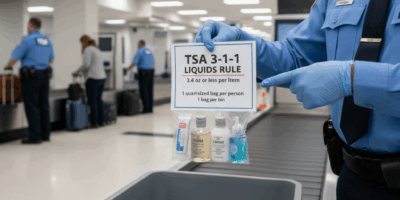
Water Bottles and Full Liquid Containers
Probably should have opened with this section, honestly. Any liquid over 3.4 ounces — that’s 100 mL — gets confiscated. Full stop. A filled 40-oz Hydro Flask gets pulled from your bag, you have to explain it, and they throw it away. Right in front of you. Empty your bottle completely before the checkpoint or buy one on the other side. Buying a $6 water bottle past security beats losing a $45 bottle to a trash can every time.
Tangled Cords in the Security Bin
Charger cords wrapped around each other look genuinely suspicious on X-ray. A compact zippered pouch — the $8 kind from any travel section — solves this entirely. Coil them loosely. Don’t leave them as a tangled cord heap in the corner of your carry-on. TSA officers sometimes have to manually sort through them, which slows everything down and makes you the person everyone in line is quietly irritated at.
Layered Clothing You Didn’t Think About
A hoodie over a jacket over a thermal is three separate items going into two bins. Lose a layer before security — wear your bulkiest piece and pack the rest. Also: hoodies with metal drawstring tips come off. That’s just how it is.
Kids’ Shoes and Jackets
Children 12 and under have to remove shoes. Older kids don’t. Adults traveling with young kids sometimes learn this at the belt for the first time. Have the little ones’ shoes off and ready before you even approach the belt. Jackets too. Practicing this at home before a trip sounds excessive — it isn’t.
Keys or Pocket Items Forgotten in Your Bag
You put your keys in your carry-on at the last second and forgot about them. The X-ray flags the bag. An officer opens it, digs around, pulls them out, asks you about them. The whole thing takes three or four minutes. Empty your bag of anything metal before leaving home — and if you’re genuinely not sure what’s in there, take everything out anyway. That’s a five-minute exercise once. Worth it.
Overstuffed Carry-Ons That Won’t Fit in the Sizer
Some airports enforce carry-on size limits seriously. A bag that technically meets the dimensions can still get flagged if it’s packed so tightly it won’t compress into the sizer. Pack with intention. Leave the outer pockets with room to breathe. Don’t fill every cubic inch just because you technically can.
When It Makes Sense to Get TSA PreCheck or CLEAR
But what is TSA PreCheck, exactly? In essence, it’s a trusted traveler program that gives you access to a shorter, faster security lane. But it’s much more than that — you keep your shoes on, your light jacket on, your laptop stays in the bag, your liquids stay in the bag. That alone cuts two to three minutes off every single checkpoint experience.
PreCheck runs $78 to $85 for five years. That’s $15 to $17 a year, roughly. Useful if you fly four or more times annually. A family of four pays around $340 total — which breaks even after approximately eight round trips once you factor in time and stress saved. First, you should apply online and schedule an in-person appointment — at least if you fly more than a couple times a year.
CLEAR is a different product entirely. $189 per year, or $15 per month. Biometric identity verification that lets you skip the standard queue before you even reach the screening lane. CLEAR might be the best option for frequent flyers, as weekly travel requires consistent time savings. That is because the per-use value compounds fast when you’re flying every Monday morning out of a high-volume hub like JFK or ORD.
While you won’t need both programs, you will need at least a clear sense of how often you actually fly before spending anything. For two to three trips a year, neither is necessary — the bin choreography in this article handles it. For business travelers and families with young children, PreCheck is worth every dollar. For road warriors flying nearly every week, CLEAR is the upgrade that makes sense. Know which category you’re in before you open your wallet.
Stay in the loop
Get the latest airport guides world updates delivered to your inbox.